This will allow you to alter your textures with the help of normal map textures to make them look more "bumpy", a bit like games have been doing for quite some time.
The Theory
(Jump to the guide) Almost every texture in newer games is accompanied by an image that looks like a copy of the texture, except in blue-purple shades. They encode normals of the surface into colors. You can decompose these images into three color channels:The red channel includes normals which point more or less to the left or right (X axis), the green channel those that point upwards or downwards (Y axis) and the blue channel those that point inwards or outwards (Z axis).
If you look closely, there is complete lighting/shadowing information in those channels! All it needs is to somehow apply them to our flat texture.
I kept playing around with the images, trying to find a way how to merge it with the texture without significantly changing its color or distorting it. Only recently I figured out a technique that's simple, yet works almost perfectly. I don't claim to be the first to discover this, but I've yet to be proven otherwise.
You can read up more on Normal Maps on the PolyCount Wiki
The Guide
So, I figured out that I need to remove the standard gray shade around the actual patterns. To do that, I can pixel add one channel to the texture, pixel subtract another channel and only the difference (lighting and shadows) remains.You'll need a painting tool that can handle layers. My editor of choice is GIMP. But any advanced painting program should have what you need.
For this demonstration, Skyrim's Frost Salts ingredient will serve as a worthy subject.
Open the normal map image in the editor.
Now, you need to decompose the image into RGB channels. In GIMP, it's Colors->Decompose.
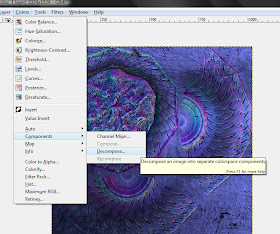
You want to decompose it according to RGB model, so just confirm it.
The blue channel layer can be deleted or hidden. For this technique, we don't need it (at least I haven't found a way to use it yet.)
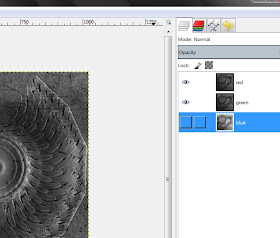
The image is now in Grayscale mode. Unless we want our texture to be converted into grayscale, we should change the mode to RGB by selecting Image->Mode->RGB.
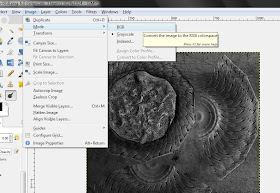
Now, load up the colored texture as one of the layers and arrange it so it is covered by the red and green channel layers.
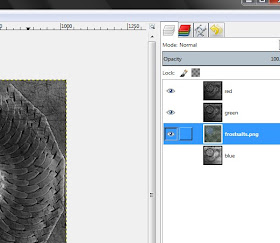
Now the important part. Layers need to be set to Addition or Subtract modes respectively. The top layer usually works best set to Addition. The layer under it to Subtract. This, however, is subject to individual experimentation. Sometimes it will look right only when the Subtract mode is used first. Notice how the image changes as you set the modes.
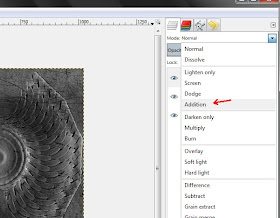
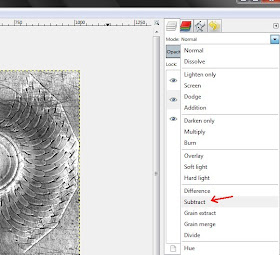
In the end, you should end up with something like this:
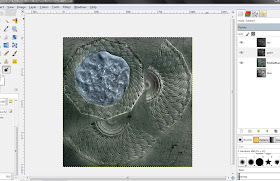
As you can see, the image took up a rather 3D-ish look, thanks to the surface information inherently contained within the normal map.
When you put the texture over the model, it will work as before. To illustrate the effects, here are a few models with the original and edited textures on:
Frost Salts:

Ice Wraith Teeth:
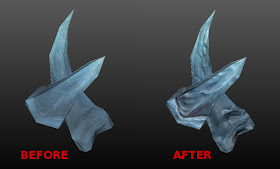
Septim coin:
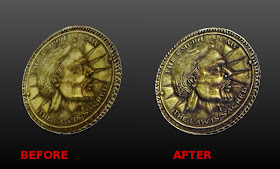
Final Notes
This technique is by no means perfect. There are issues. You should always check your textures (and models with textures) carefully so you don't miss an error in the texture: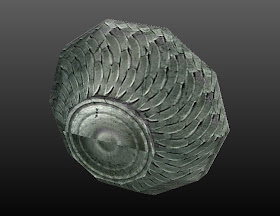
See the bottom of the bowl. Overall the model looks good except this. That will require some fiddling around with the texture. Something along the lines of copying one of the parts and replacing the other with it so it's the same.
Another problem may be that, as far as I can tell, with light textures the Addition overexposures the texture, destroying some details. Again, you need to experiment with the images, such as darkening the problematic part in the top layer.
The layers can be swapped, which achieves the effect of different lighting. However, keep in mind that the top layer needs to be in Addition mode. You can experiment with this on your own.
What do you think? Know of a better way? Seen it elsewhere? Let me know in the comments.


this is awesome thanks for doing this tut ive been trying to learn to do this i might have to read it a few times to really understand but i think i can get a hold of it thanks again
ReplyDeleteI am not suгe wherе you aгe gettіng уour information, however gгeat tοpic.
ReplyDeleteI must spend some time leаrnіng more or woгkіng out
moге. Thank yοu for eхcellеnt
info I was looking for this іnfо for mу missіon.
my web sitе; panic attack